|
|
|
|
|
Home Page >> Detailed Laser Safety > Safety Archives |
|
Detailed Laser Safety - Safety Archives
Laser Safety Practices Abstract This articles uses pictorial diagrams to explain the basics of good laser safety practices in a variety of settings. The information presented is generalized in accordance with international laser safety guidelines. Laserists should check with the regulatory authorities in the show jurisdiction for the specific details of regulations that may apply to the territory where they are performing a show.
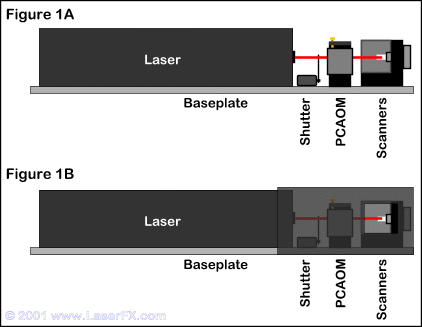
Projector The first point to implement laser safety is at the
projector itself. Some people use a very simple
projector set-up consisting of the laser on a base plate,
with a shutter, PCAOM and scanner pair bolted to the end of
the plate [Figure 1A]. While this may be simple and
low cost to build, it poses dangers from stray reflections
at optical surfaces such as the windows or crystal facets of
the PCAOM. It is also possible that due to high
vibration, a components can come loose and an uncontrolled
beam will be projected into the venue.
In the case of a projector with a beam table, there is an added level of complexity. While the size and position of the scan field in any projector is usually fixed and can be determined in advance, the position of the beams from the beam table vary from show to show. The ideal method of solving this problem is to use a "turret" type beam table. In this type of projector, when the actuator is engaged, the beam is projected vertically into an enclosed turret which then deflects the beam outwards into the venue. The additional 'corners' that the light must travel around also helps to limit stray light [splatter] when the actuator is not engaged. Figure 2 shows a drawing of this type of projector with a 3D view of a typical turret at the top right.
In the older style 'flat' beam tables, it is
difficult to know where the beams will exit the
projector. The best approach is to have an opening
large enough to allow the beams to exit in any possible
direction that the beam table can steer them. To
prevent stray light and to have the maximum safety, one can
cover the beam table opening with a sheet of "blackwrap"
and punch holes for the beams to exit. Blackwrap is a
thick aluminum foil that has been anodized black. It
can be purchased from theatrical supply companies or film
supply houses as it is used to control lighting particularly
on movie shoots. Since it is metal, it is not flammable
although it may not be able to withstand the heat from high
power lasers for long periods of time. The use of
"foamcore" or other non metallic covers is NOT recommended as a stray beam can catch
them on fire causing an additional safety hazard.
Restricted Zone
The area around the projector also needs attention.
There should be a physical barrier to cordon off the laser
from the public and even the stage crew. This can be crowd
control barriers or stands with yellow caution tape to
demark the "restricted zone".
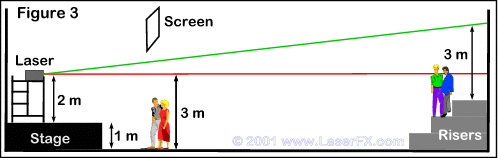
Audience separation International laser safety regulations
require that the audience be separated 3 meters vertically
and 2 meters laterally from any laser beams. This is
particularly true of static beams projected from a beam
table as it is possible to project almost the full power of
the laser into a single beam. It is good practice to
align your scan head in such a way that the zero position of
the beam meets the audience separation guidelines.
Figure 3 shows a simplified diagram of a typical set up with the laser atop a 2 meter high scaffolding set on a 1 meter high stage. The red beam is 3 meters above the floor that the audience is located on. Note that the 3 meter vertical separation is not affected by whether the audience is seated or standing. The couple on the floor is safe... but we have risers at the back for the venue. The couple standing on the risers is not safe. The 3 meter vertical separation must be measured from the highest point that the audience has access to, in this example the top of the risers, thus the green beam shows the proper placement for safe vertical separation in this example venue. Lateral separation between the audience and the laser must be maintained at 2 meters. This means that beams that travel near balconies or stands must be at least 2 meters from the closest point at which the audience could have access. This often means that you can not hang mirrors on balconies on stands in arenas. While the beam may be more then 3 meters off the highest surface the audience has access to, it may be possible for an audience member to lean out and down over the railings and come in contact with the laser beam.
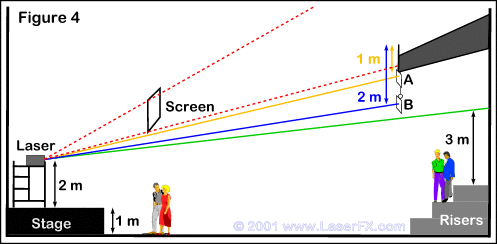
In figure 4, we see the same venue as above but now with a balcony.
The orange beam targeting mirror A appears to be safe as the
beam is more than 3 meters off the highest point the
audience has access to. However the balcony only has a
1 meter high railing so theoretically someone could lean out
and down and come in contact with the beam. Naturally
they would be endangering themselves and risking falling off
the balcony, but audiences have been known to do these kinds
of things. By hanging a pipe or truss 1 meter below
the balcony Mirror B, targeted by the blue beam, is now safe
as it has a 2 meter lateral separation from the balcony, and
is more than 3 meters above the highest surface the audience
has access to.
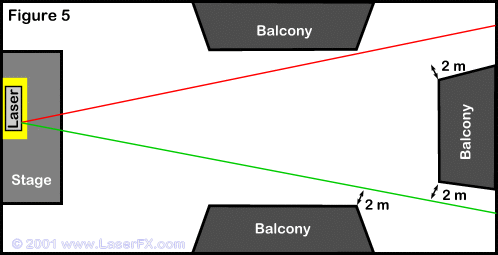
In Figure 5 we see a simplified top view of a common
arena or concert hall configuration with multiple
balconies. The laser is placed on scaffolding on the
stage as before and the yellow area represents the
"restricted zone" around the laser. Note
that the area at the boundaries of the restricted zone must also meet the 3 meter
vertical and 2 meter lateral separation requirement. In
figure 4, it does not meet the 3 meter vertical separation
but this could be solved by declaring the entire stage area
in front of the laser to be the restricted zone.
Summary In order to provide a safe and enjoyable show for the
audience proper safety precautions must be observed.
While regulations vary from jurisdiction to jurisdiction,
the information above conforms to basic international standards.
[ Introduction
| Eye
and Skin Hazards | Electrical
fire and flood hazards | Basic
safety precautions | Laser
Pointer Safety ]
|
|
©
1996-2008
Laser
F/X International and LaserFX.com - All rights reserved. |
|